
Jupyter notebook is a web based open source application developed by Project jupyter. It is platform independent as it runs directly on your web browser. Jupyter notebooks are extremely user friendly and provide an interactive web based environment that allows you to write and share documents containing live code. Jupyter notebooks are extensively used for data science projects and reports as they allow interactive visualizations, graphics, plots, mathematical equations, etc.
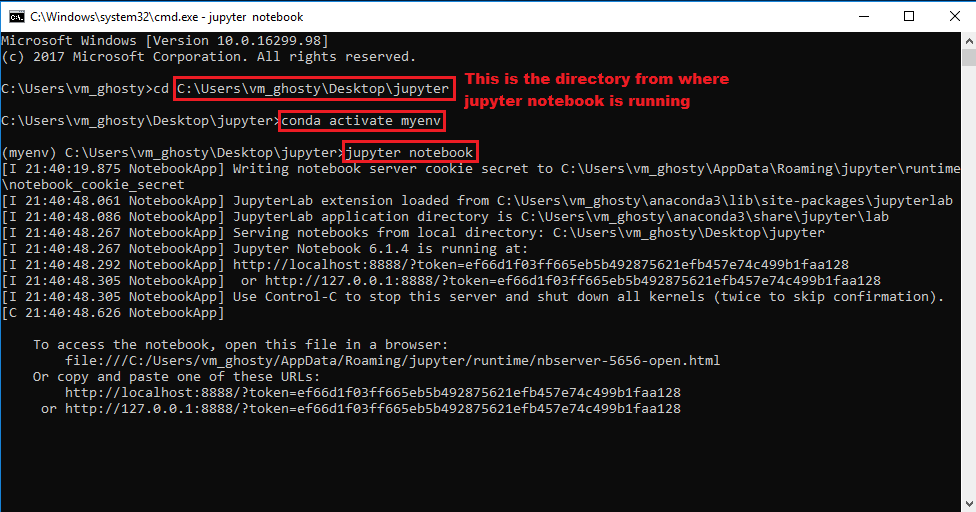
Let’s see how to install and run jupyter notebook in an anaconda environment
Installation and getting started:
Once you have installed Anaconda and added conda to path you can easily run jupyter notebook, just open command prompt and activate the virtual environment in which you want to run jupyter notebook, use the following commands:
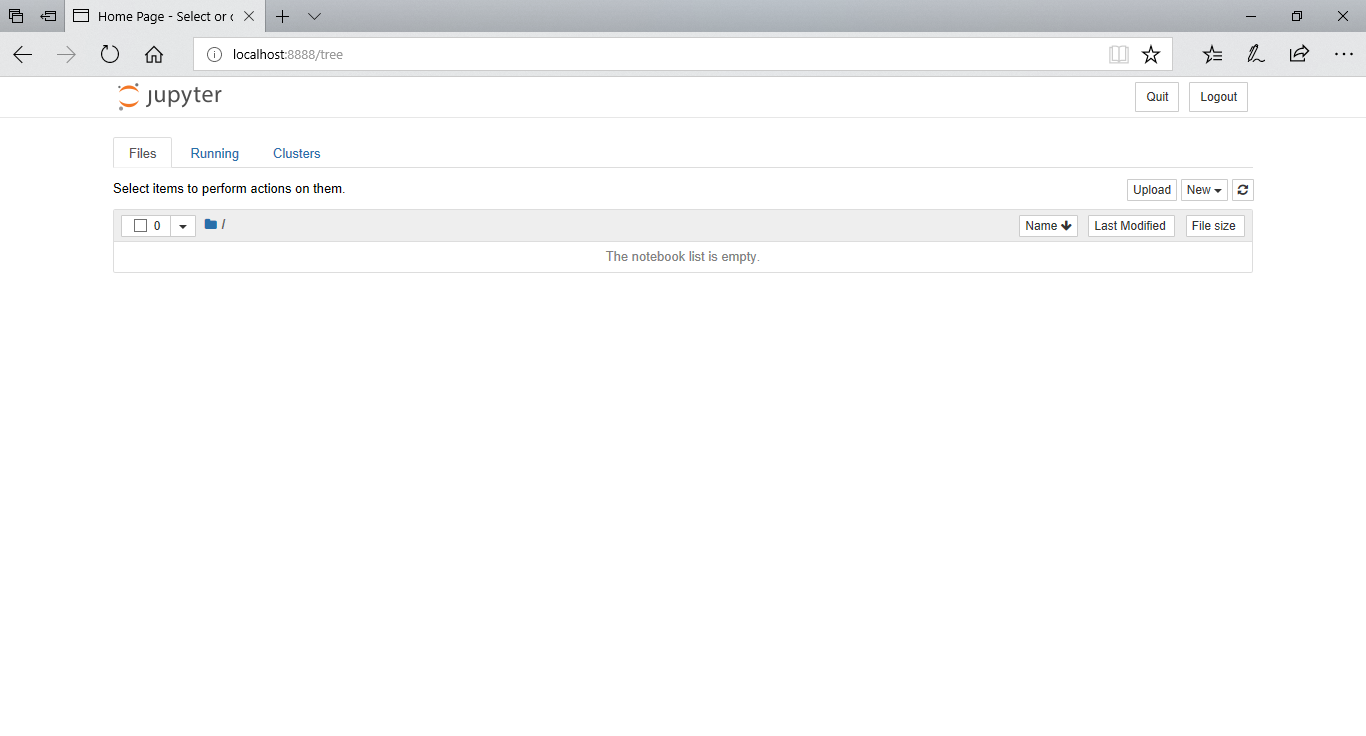
Dashboard:
Once jupyter notebook is running you will see this page open up in your browser. This is the notebook dashboard
The jupyter server by default runs on port 8888.
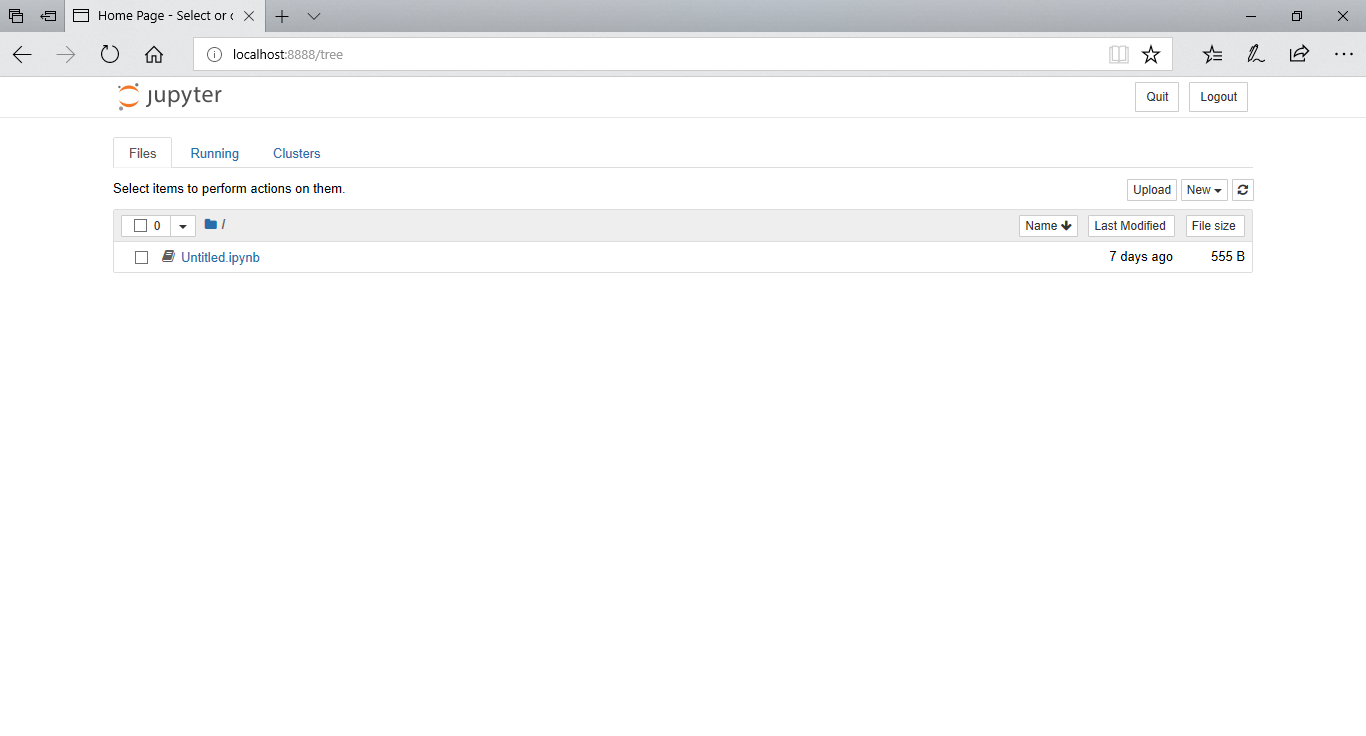
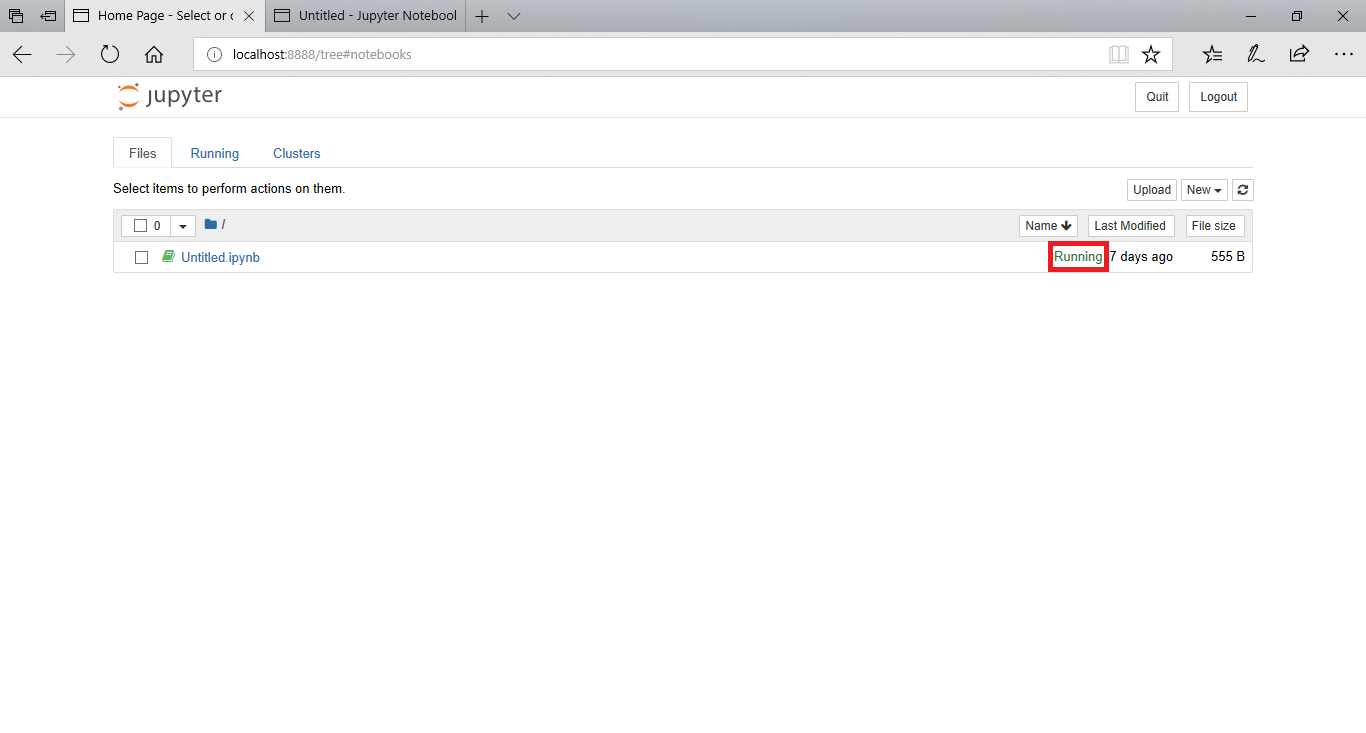
Files Tab:
The files tab gives a list of all the files and folders under the current directory, from where the notebook is running
The running written on the right side indicates that the particular notebook is currently active.
Running Tab:
The running tab gives a list of all the notebooks which are currently active.

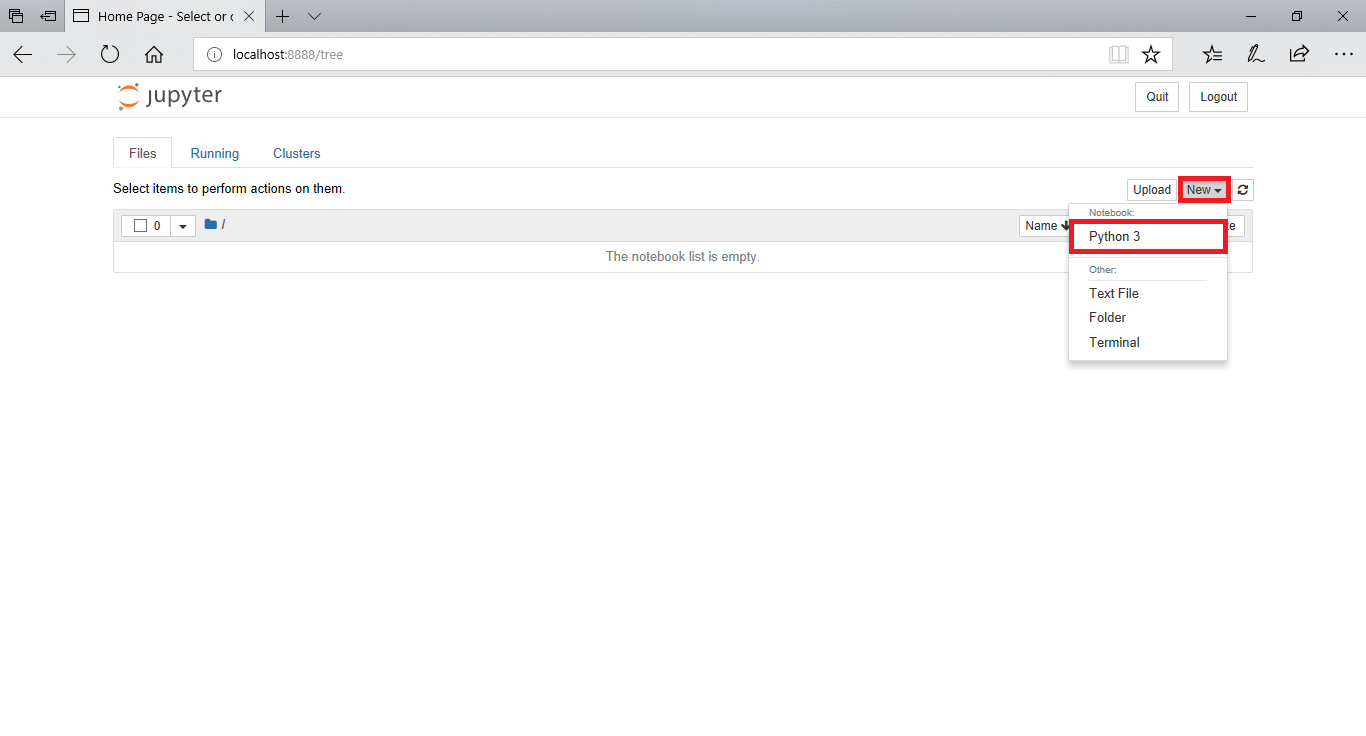
Creating a new notebook:
To create a new notebook you can use the new dropdown menu in the top right. Just click on the dropdown and select python3 to start a new python notebook.
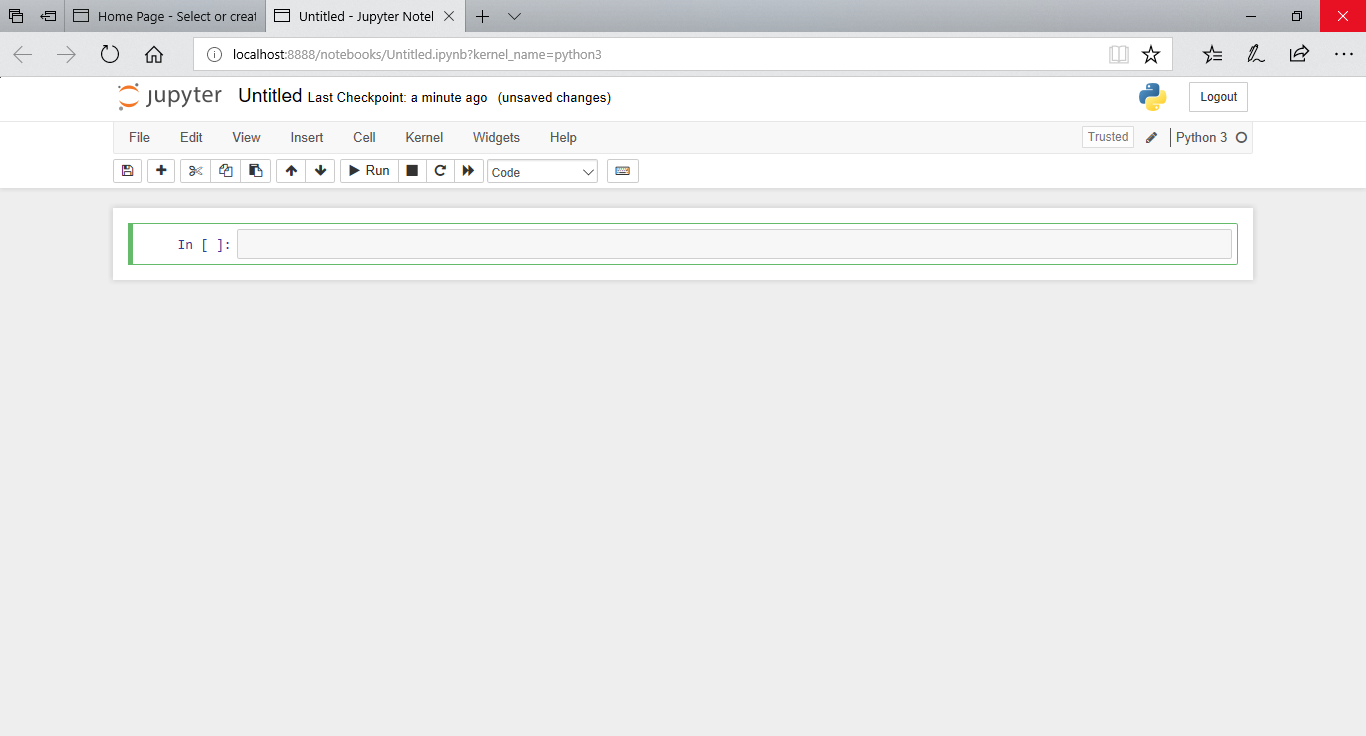
User Interface:
Let's understand the interface of jupyter notebook
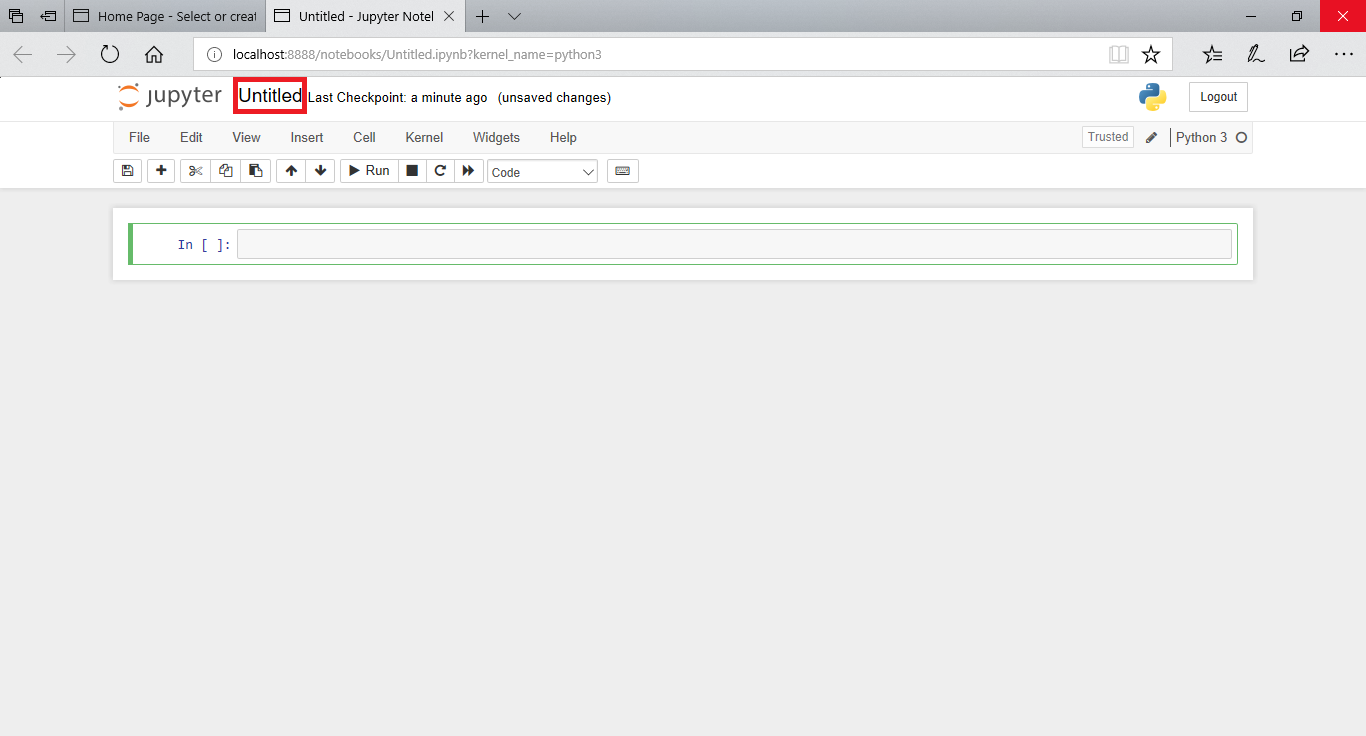
Renaming a notebook:
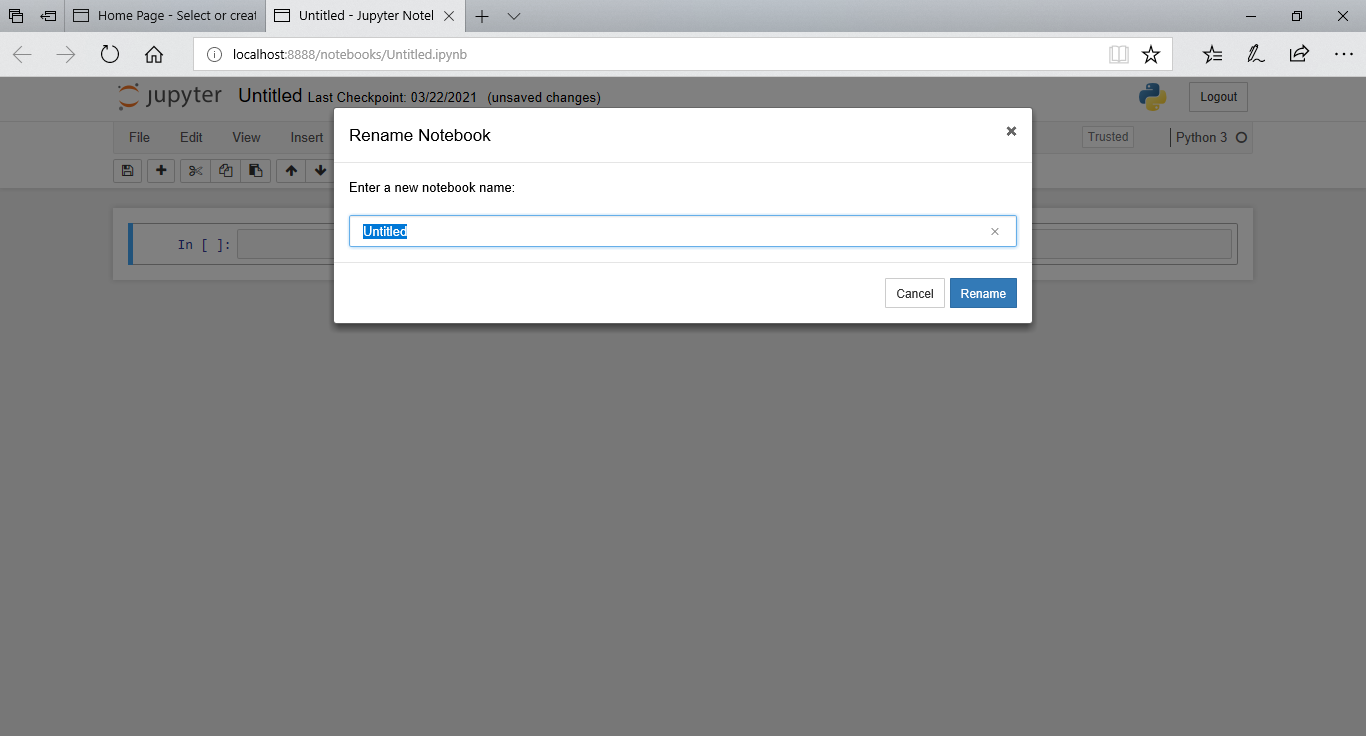
When you create a new notebook it will be named untitled initially. To rename the notebook just click on Untitled written right besides the jupyter logo on the top left and rename the notebook.
You can rename the notebook when this dialog box pops up.
Menu Bar:
The menu bar is located just below the jupyter logo on top. The menu bar gives a list of options which let us perform different operations on the notebook. We will discuss all these options in detail later here.
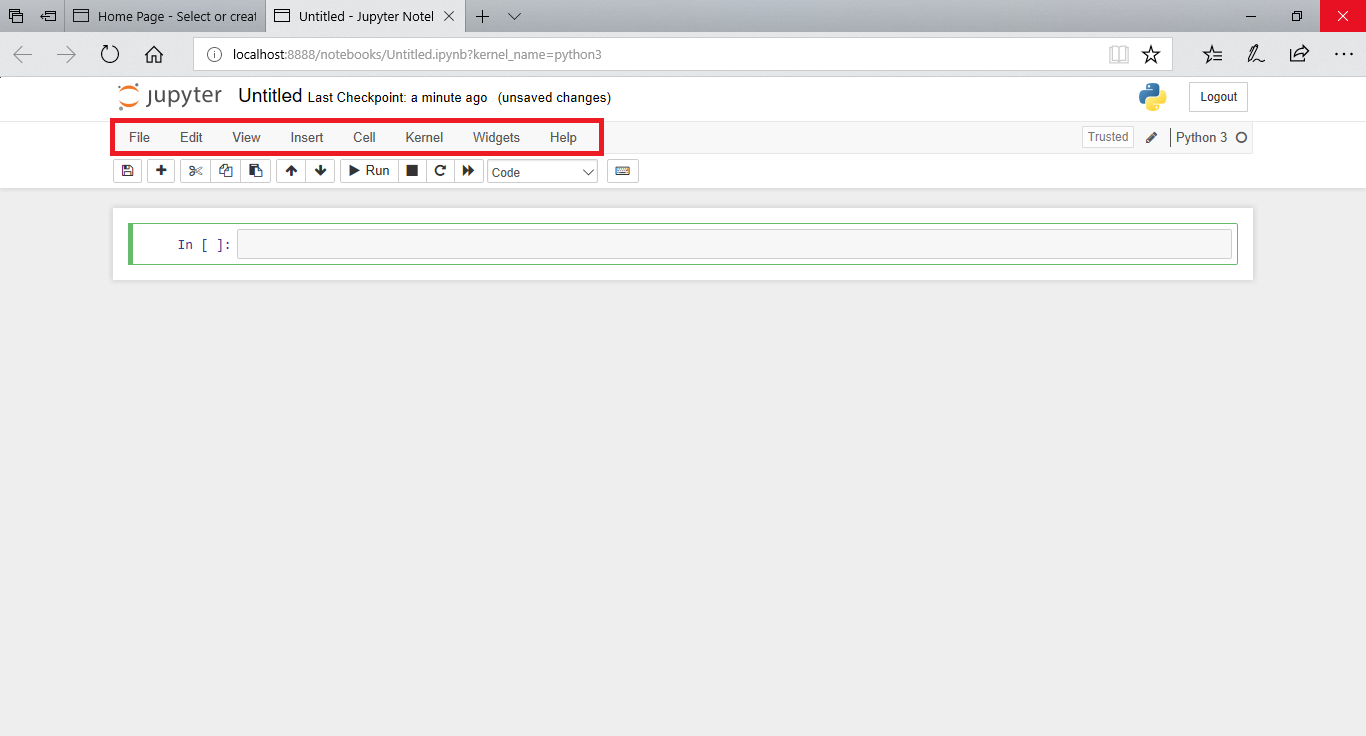
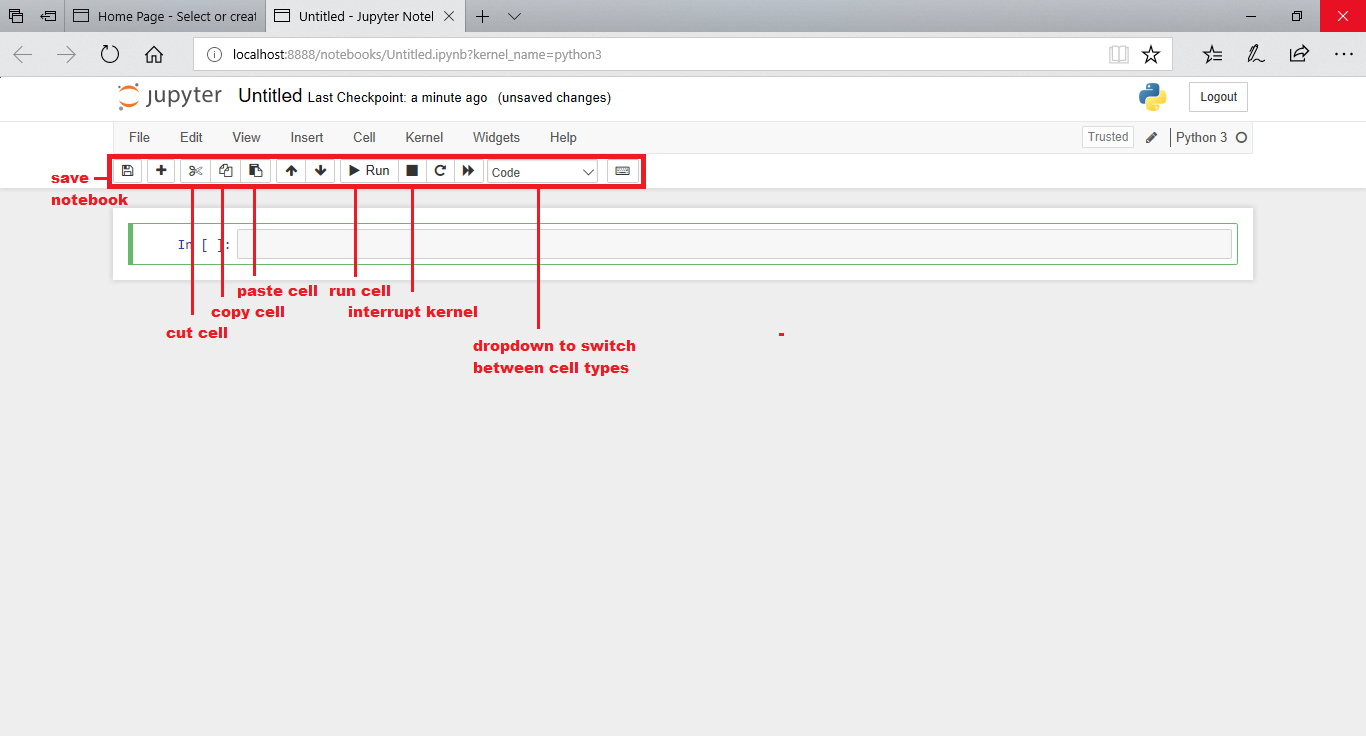
Tool Bar:
The toolbar is located just below the menu bar. It lets us perform some often required operations.
Kernel indicator:
The kernel indicator symbol is a circle and is displayed to the right of the kernel name. It tells us if the kernel is active or idle
If the kernel is idle the circle is hollow
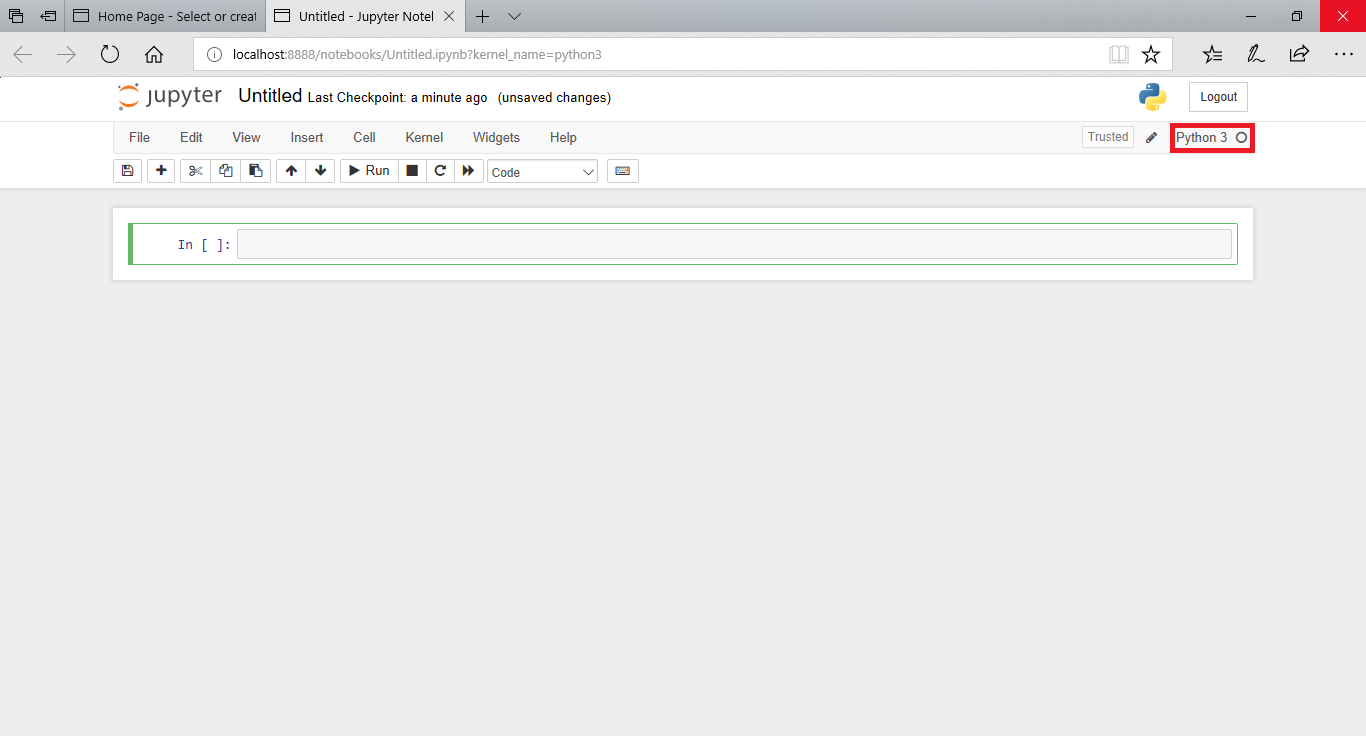
If the kernel is active the circle is solid grey color

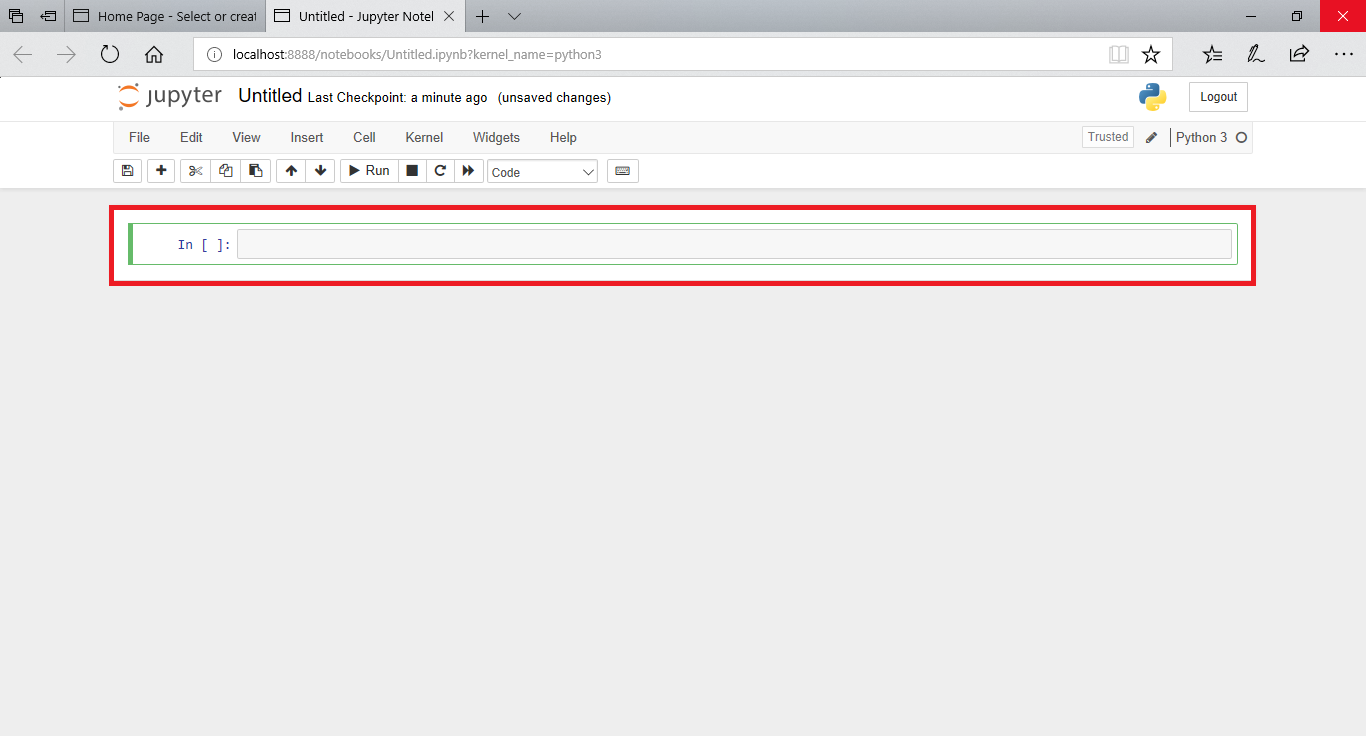
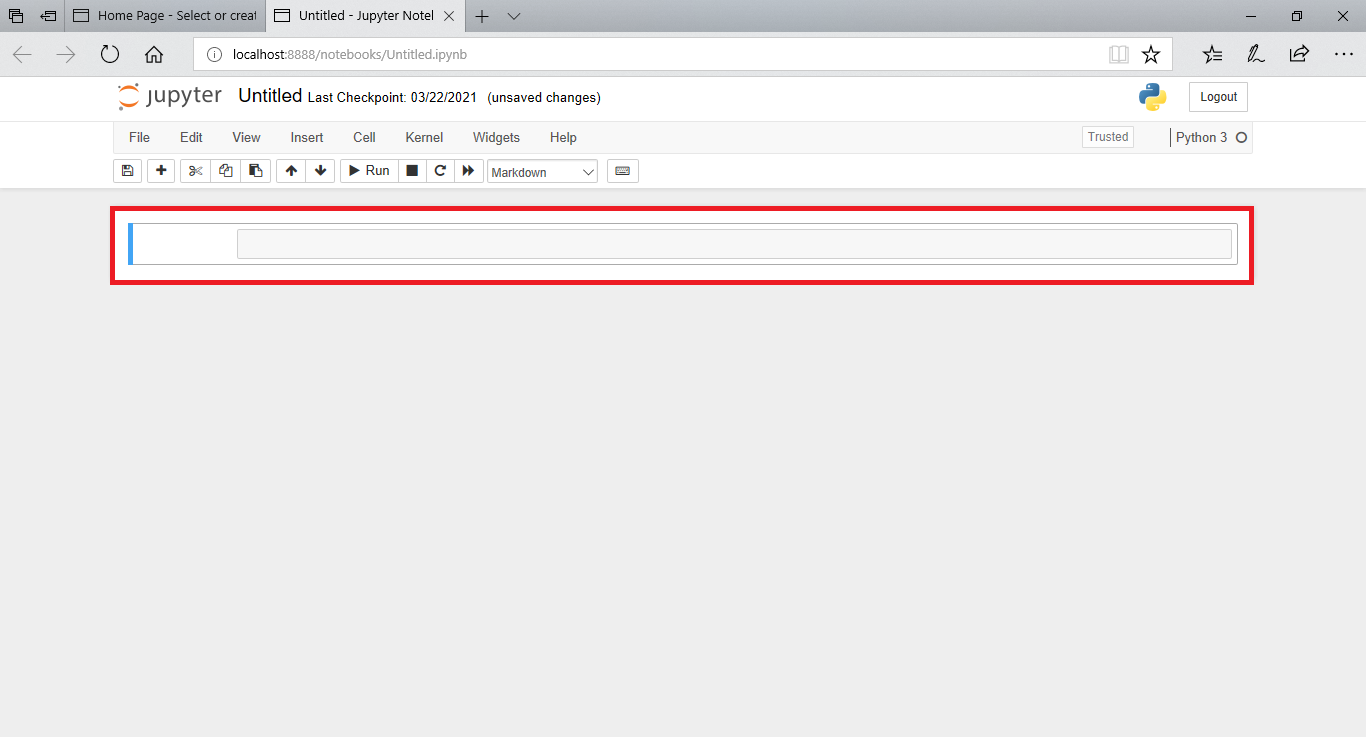
Cells:
The blocks in jupyter where you write your code, comments or any text are called as cells. There are three main type of cells in jupyter notebook, namely code cells, markdown cells and raw cells.
Types of cells:
Code cell:
The cells where In, which stands for input, is written are called as code cells. As the name suggests whatever code you have to write you write in these cells. On running the code cell the output is displayed in an output cell.
Markdown cell:
Markdown cells are mostly used to write text data. The text written in markdown cells can be formatted using markdown language which is a writing standard for data scientists and data analysts. Suppose you have to write any headings, comments or conclusions for your reports markdown cells can be used. To format the text different markup tags are used which we will be discussing in detail here.
Raw cell:
Raw cells are only useful while converting your notebook to some other format such as HTML or LaTeX, using the command line tool nbconvert. The contents of the raw cell are rendered in a specific way. Raw cells in LaTeX format will be rendered after applying nbconvert and are only visible in LaTeX output.
Cell operations:
Lets look at the different operations which can be performed on cells.
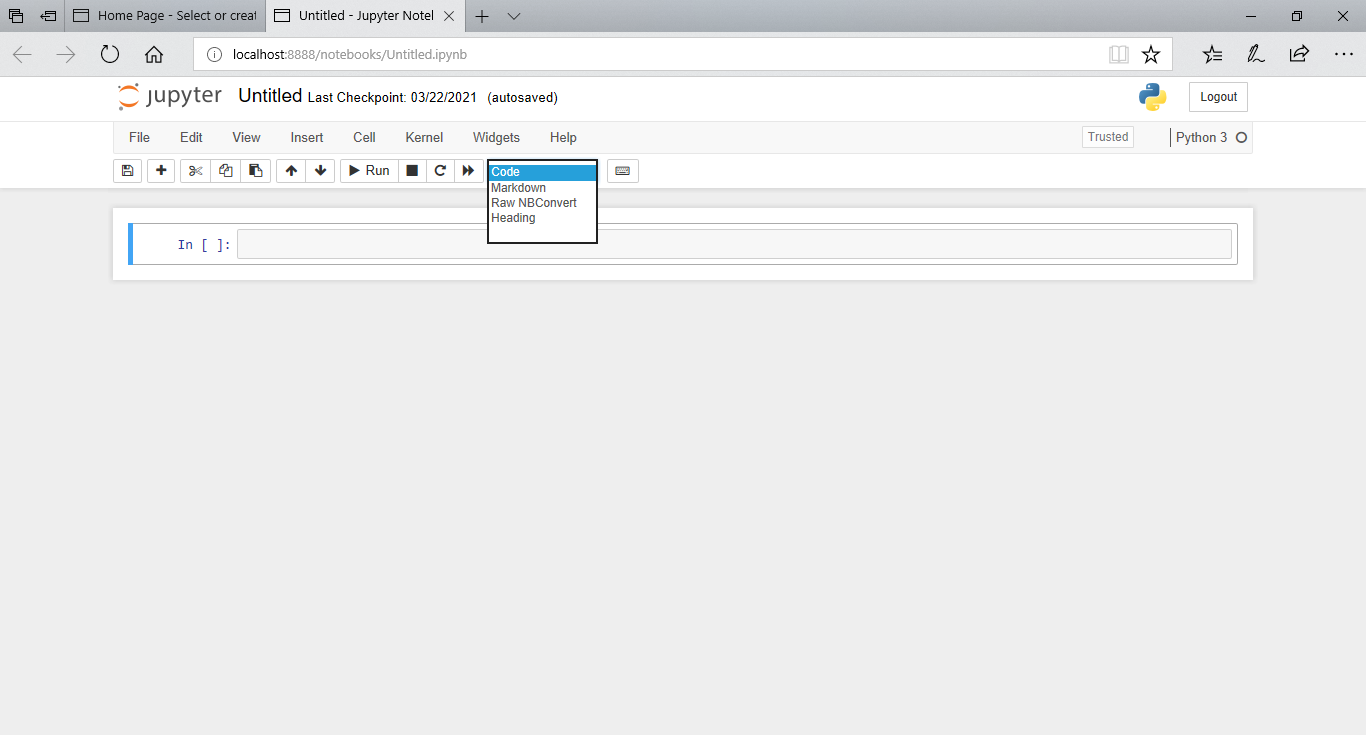
Cell conversion:
To convert a code cell to markdown cell or a markdown cell to code cell you can use this dropdown menu, just click on the code cell you want to convert and select markdown from the dropdown menu this will convert that particular code cell to markdown cell, similarly you can convert a markdown cell to code cell. you can either switch between code and markdown cells by using the dropdown menu or you can also use the keyboard shortcuts discussed here.
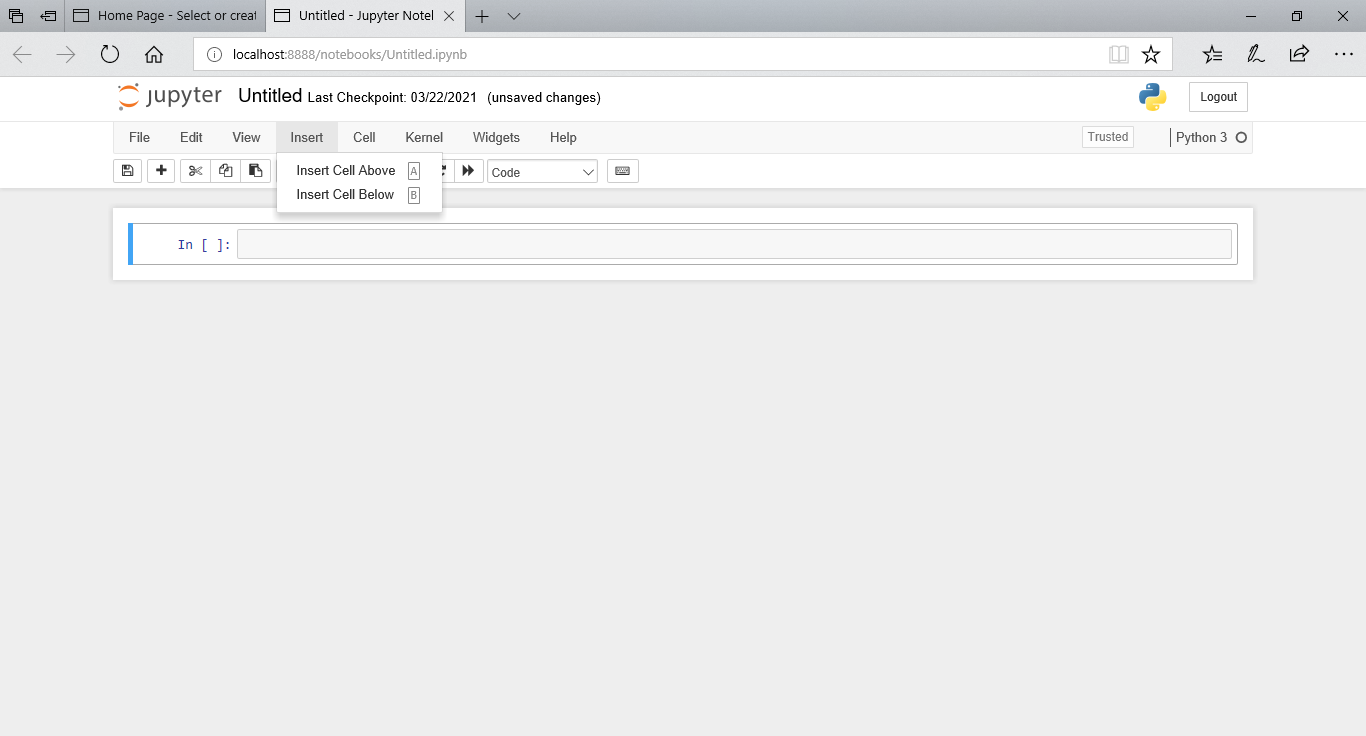
Insert menu:
The insert menu allows you to insert new cells. It gives you two options, you can either insert cells above or below. By default a code cell is inserted. For inserting new cells you can either use the insert menu or you can also use the keyboard shortcuts discussed here.
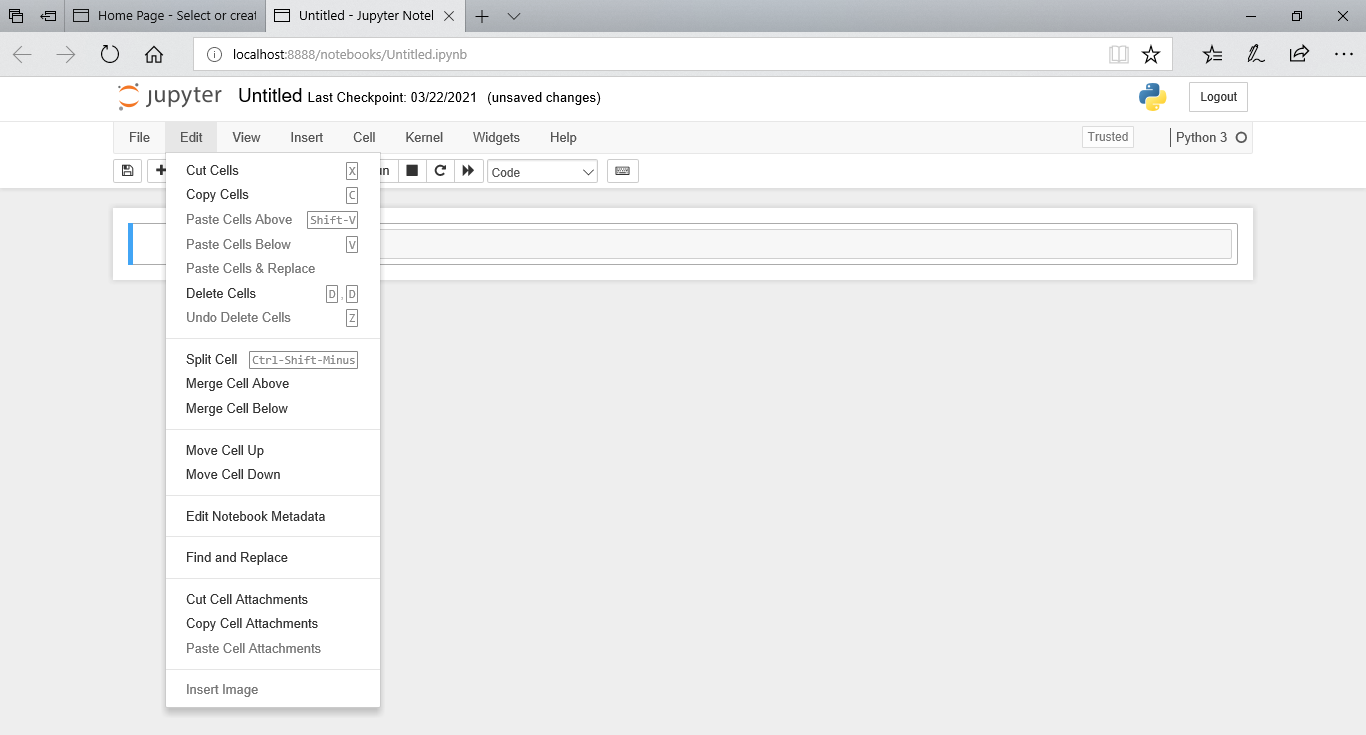
Edit menu:
The edit menu allows you to perform different operations on cells such as cut, copy, paste and delete cells. You can also move selected cells up or down. Just click on a cell and select what operation you want to perform on that particular cell, from the edit menu. For performing these operations you can either use the edit menu or you can use the keyboard shortcuts discussed here.
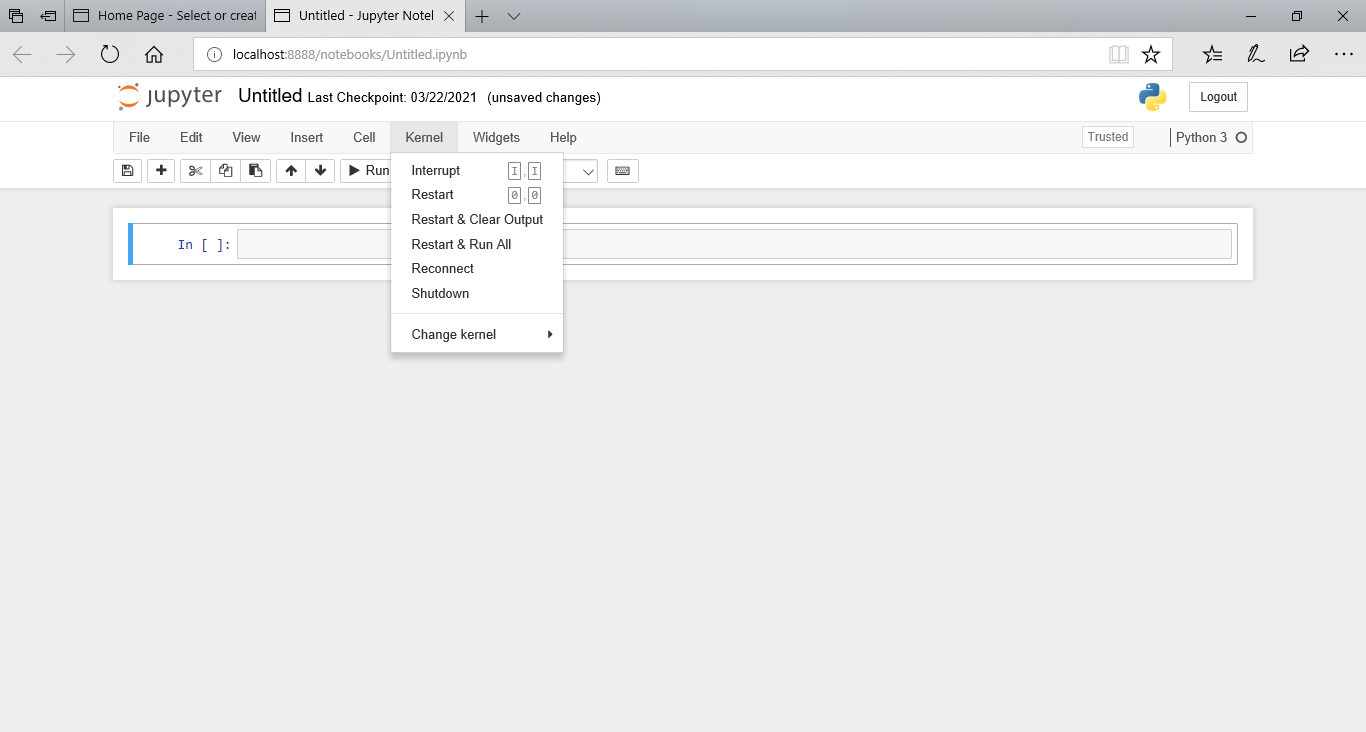
Kernel menu:
The kernel menu allows you to start, interrupt, shutdown or restart a kernel. Sometimes if your code is stuck in a loop or if you want to clear all the stored values and reset the state of the notebook you can restart the kernel. Kernel menu also allows you to start a new kernel.
Edit and Command mode:
Menu bar and tool bar lets you perform different operations but there are certain keyboard shortcuts, to perform the same operations, which come in handy.
Jupyter notebook has two different modes to perform different operations using keyboard inputs
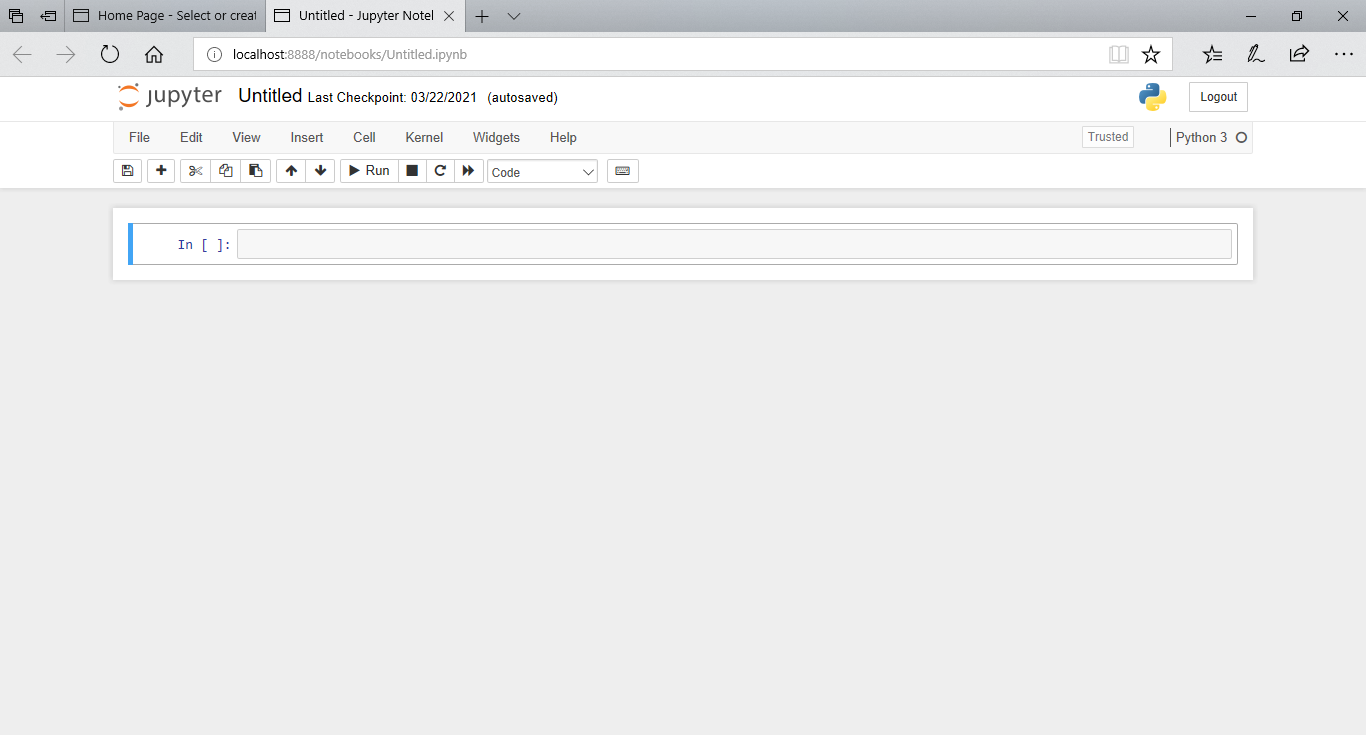
Command mode:
Grey cell border with a blue left margin indicates that command mode is enabled. command mode let's user perform notebook level actions i.e. you can edit the notebook as a whole but cannot type in individual cells. To enter command mode you need to press Esc on your keyboard
Let's look at the different keyboard shortcuts used in command mode
| Key [esc+command] | Action | Key [esc+command] | Action |
|---|---|---|---|
0,0 |
restart the kernel | Enter |
enter edit mode |
1 |
change cell to heading 1 | 2 |
change cell to heading 2 |
3 |
change cell to heading 3 | 4 |
change cell to heading 4 |
5 |
change cell to heading 5 | 6 |
change cell to heading 6 |
A |
insert cell above | B |
insert cell below |
C |
copy selected cell | D,D |
delete selected cell |
F |
find and replace | H |
show keyboard shortcuts help dialog box |
I,I |
interrupt kernel | JDown |
select cell below |
KUp |
select cell above | L |
Toggle Line numbers |
M |
change cell to markdown | O |
toggle output of selected cells |
PCtrl-Shift-PCtrl-Shift-F |
open the command pallete | Q |
close the pager |
R |
change cell to raw | SCtrl-S |
save and checkpoint |
V |
paste cells below | X |
cut selected cells |
Y |
change cell to code | Z |
undo cell deletion |
Shift-Enter |
run cell, select below | Ctrl-Enter |
run selected cells |
Alt-Enter |
run cell and insert below | Shift-KShift-Up |
extend selected cells above |
Shift-DownShift-J |
extend selected cells below | Ctrl-A |
select all cells |
Shift-V |
paste cells above | Shift-M |
merge selected cells |
Shift-O |
toggle output scrolling of selected cells | Shift-L |
toggles line numbers in all cells |
Shift-Space |
scroll notebook up | Space |
scroll notebook down |
Note: Hyphen means those keys are to be pressed simultaneously and comma means that key has to be pressed twice. For single press keys you need to use Esc key to enter command mode first for e.g. to convert a cell from code to markdown the command is Esc+M |
|||
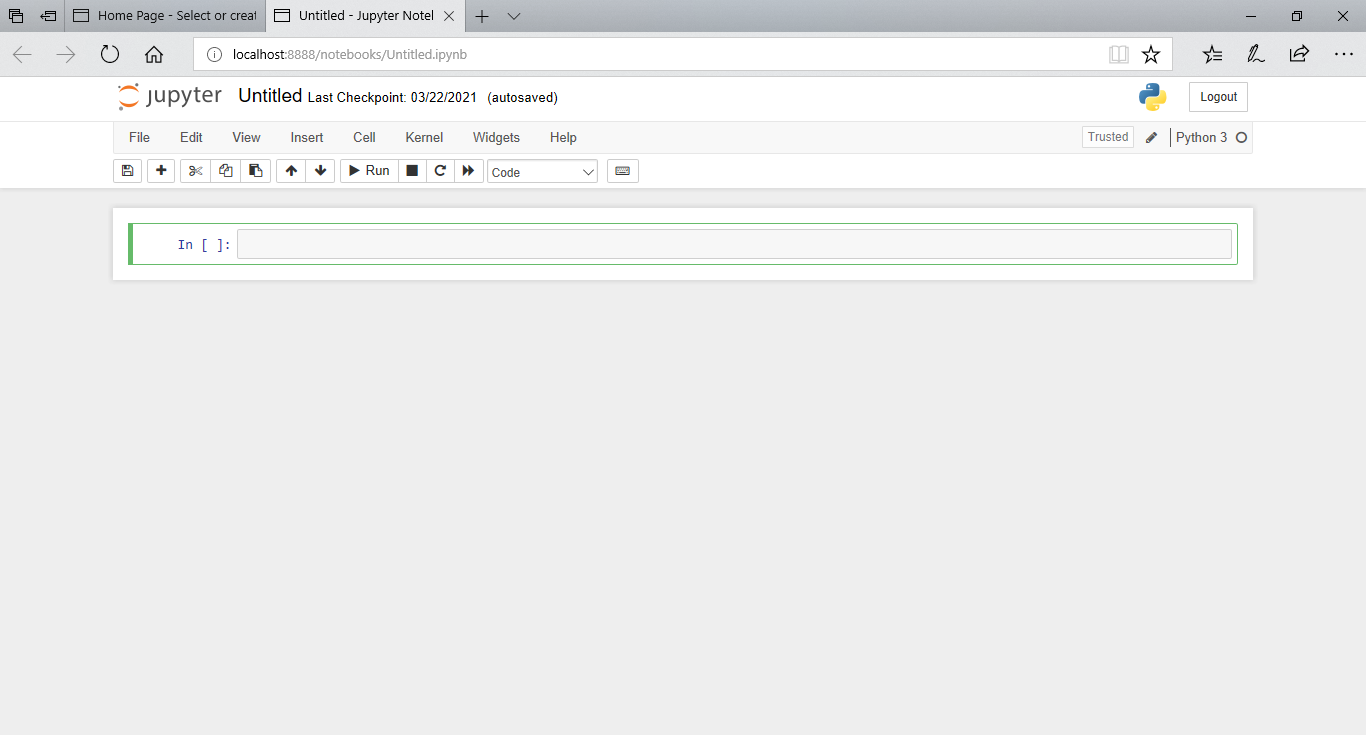
Edit mode:
Green cell border with a green left margin indicates that edit mode is enabled. Edit mode let's user perform cell level operations i.e. while typing in a cell edit mode is active.
Let's look at the different keyboard shortcuts used in edit mode
| Key [Enter+command] | Action | Key [Enter+command] | Action |
|---|---|---|---|
Tab |
code completion or indent | Shift-Tab |
tooltip |
Ctrl-] |
indent | Ctrl-[ |
dedent |
Ctrl-A |
select all | Ctrl-Z |
undo |
Ctrl-/ |
comment | Ctrl-D |
delete whole line |
Ctrl-U |
undo selection | Insert |
toggle overwrite flag |
Ctrl-HomeCtrl-Up |
go to cell start | Ctrl-EndCtrl-Down |
go to cell end |
Ctrl-Left |
go to one word left | Ctrl-Right |
go to one word right |
Ctrl-Backspace |
delete word before | Ctrl-DeleteDown |
delete word after |
Ctrl-Y |
redo | Alt-U |
redo selection |
Ctrl-MEsc |
enter command mode | Ctrl-Shift-FCtrl-Shift-P |
open the command pallete |
Shift-Enter |
run cell, select below | Ctrl-Enter |
run selected cells |
Alt-Enter |
run cell and insert below | Ctrl-Shift-Minus |
split cell at cursor |
Ctrl-S |
Save and Checkpoint | UpDown |
move cursor up move cursor down |
| Note: Hyphen means, those keys are to be pressed simultaneously. | |||
Markup Tags used in markdown cells:
Let's look at some markup tags used in markdown cells.
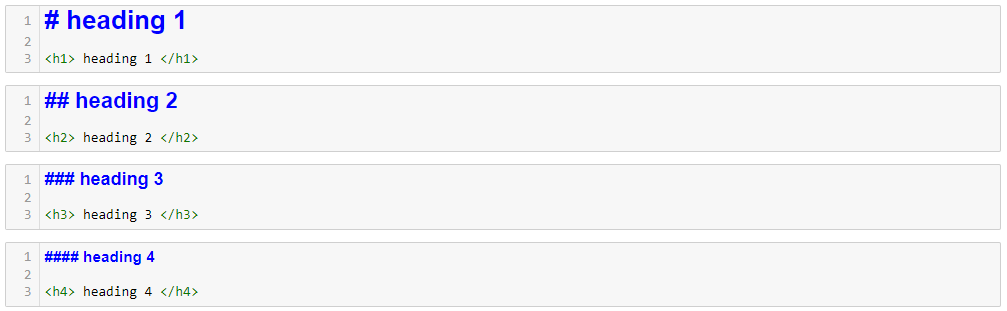
Headings:
You can add headings by using one or multiple #, followed by a space, depending upon the level of heading you want.
You can also add headings using <h1> heading here </h1>, where the level of heading can be from 1 to 6.

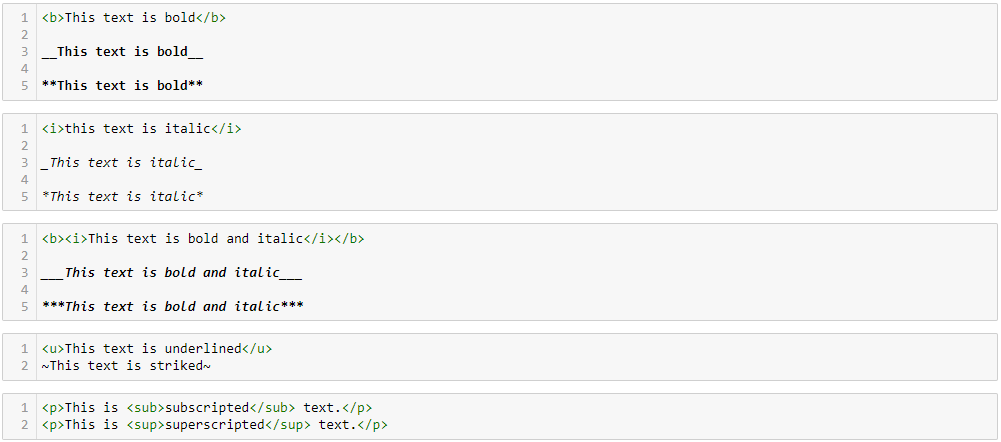
Text Formatting (Bold, Italic, Underlined text, etc.):
Different markup tags can be used for text formatting. To make the text bold you can either use double underscore __ or double asterisk ** before and after the text, without any space in between. You can also use <b> bold text here </b> to make the text bold
For italic text you can either use single underscore _ or single asterisk *before and after the text, without any space in between. You can also use <i> italic text here </i> to make the text italic
For underlined text you can use <u> text will be underlined </u>.
To cancel a text i.e. to get a strike across the text you can use ~ before and after the text.
To get subscript and superscript you can use the <sub> text will be subscripted </sub> and <sup> text will be superscripted </sup> respectively.

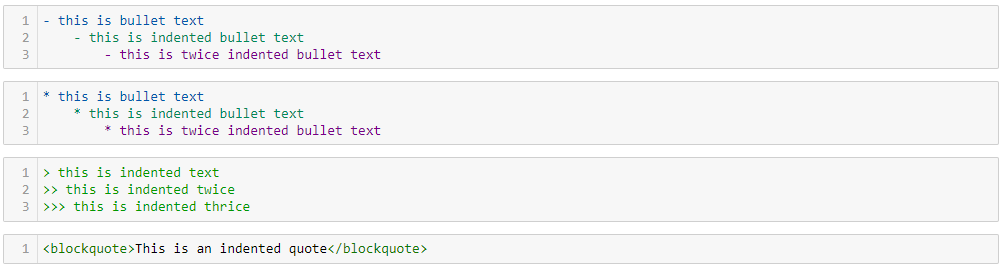
Bullets and indentation:
To get bullets you can either use hyphen - or a single asterisk * before the text, with a space in between. For a sub bullet you can use tab followed by - or *, before the text.
For indentation you can use > before the text.
For a block quote you can use <blockquote> This is a quote </blockquote>

Html Tags with inline css styling (align text, text size, text color, etc.):
For formatting the text you can also use html tags with inline css styling, such as setting the background color, font size, text color, text alignment, etc.


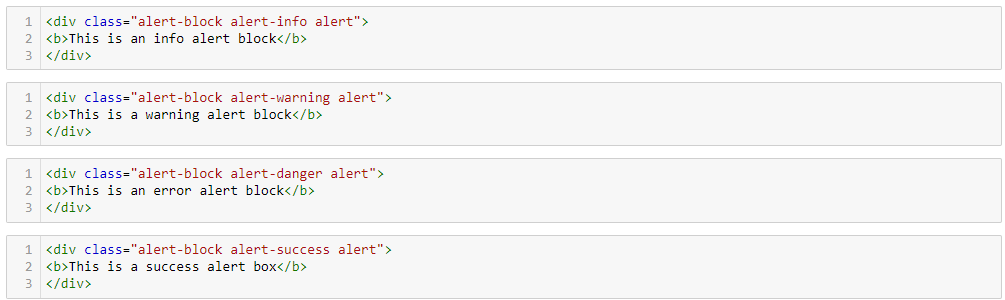
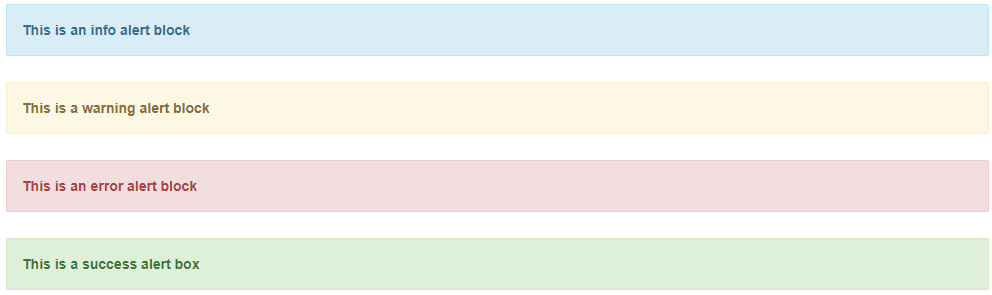
Colored note boxes:
You can use <div> tags to create colored note boxes. The colors of the boxes define the purpose for which the boxes are being used.
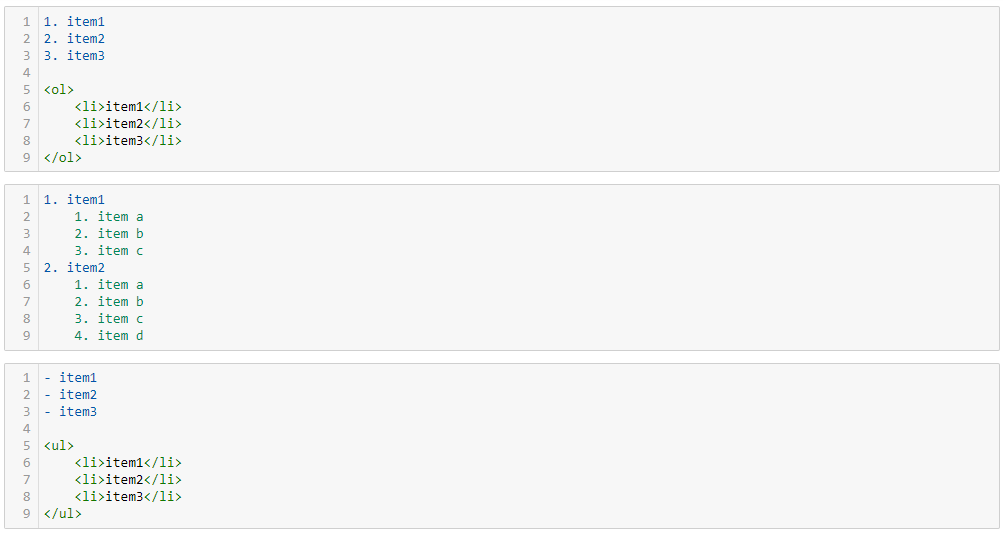
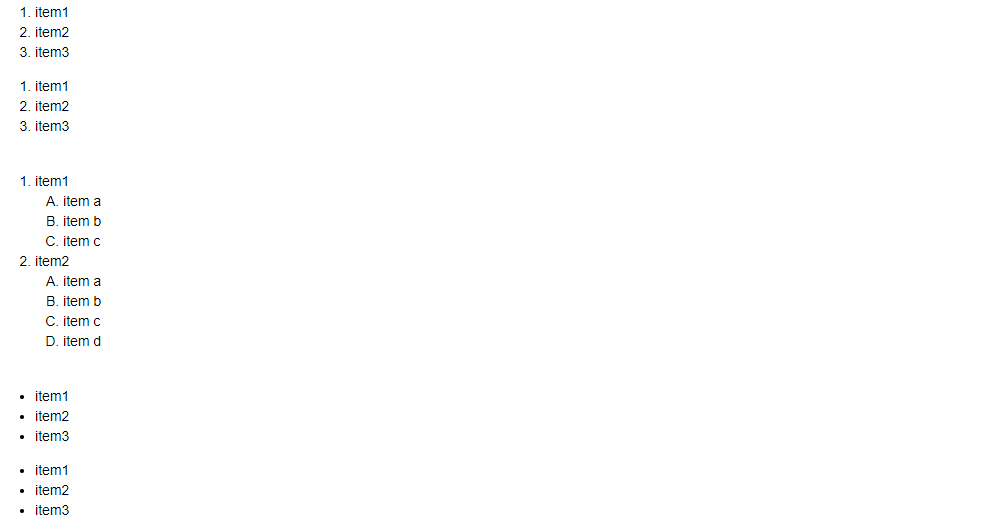
Ordered list:
To get an ordered list you can just write the numbers in the required order before the list items or you can use the <ol> and <li> tags
To get a sub list you can just use tab before the list item numbers.
You can use hyphen - or <ul> and <li> tags for a bullet list.
Line break and horizontal lines:
You can use <br> tag to get a line break and <hr> tag to get a horizontal line.


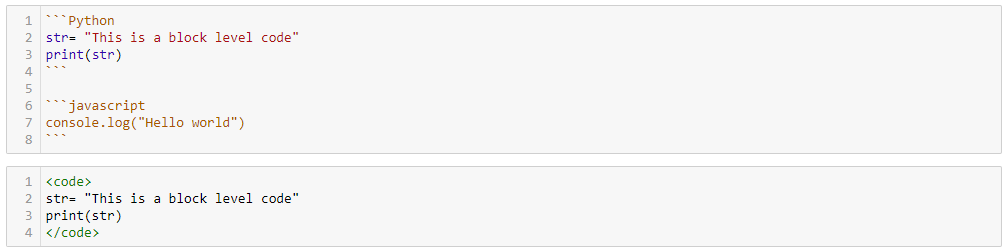
Embedded code:
To embed a code in markdown you can either use three backticks ``` before and after the code block or you can use the <code> This is a code block </code> tag. This code block is only for illustration and will not be executed.
The code block written between three backticks ``` uses GFM i.e. Github Flavoured Markdown.

Mathematical equations:
Mathematical equations or symbols in markdown can be written in between dollar symbol, $ mathematical expression $. The equations written in between dollar symbols are inline equations.
To get equations on their own line i.e. to write outline equations you can use two dollar symbols before and after the equation $$ outline mathematical expression $$
You can also use the \begin{equation} mathematical expression \end{equation} tags to write mathematical equations


Tables:
The tables in markdown can be written by using a combinations of vertical pipes, |, to define rows and columns. The header can be seperated from the table content by using a set of hyphens, -. The notebook automatically resizes the content to fit in the given cell properly.
You can also use the <table> tag to define a table. The <th> tag defines the header for the table. The <tr> tag is used to define the table rows and the <td> tag is used to input the table data.


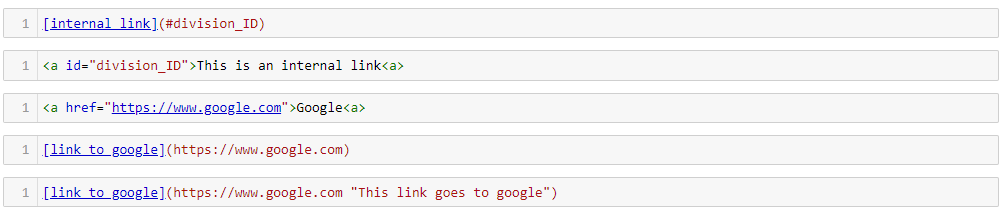
Internal and external links:
You can define internal links in markdown by using [title](#division_ID), where id is linked to a section of the notebook.
You can also define an internal link by using <a> tag, where the id attribute is linked to a section of the notebook.
You can define an external link by using <a> tag, where the href attribute contains destination address of the external link or URL.
You can define an external link with hoverable text by using [title](external link "hoverable text").

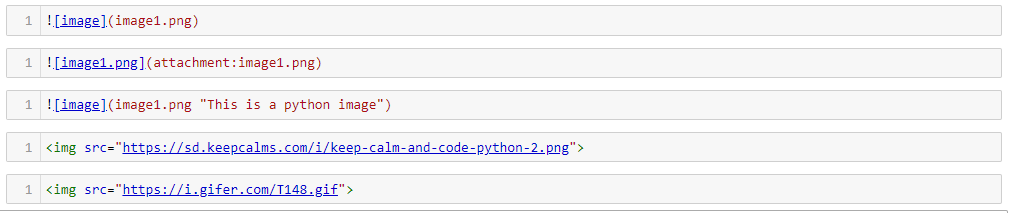
Embedding images and GIFs:
You can embed images and gifs in markdown by using  or you can also embed an image with hoverable text by using .
You can also embed images by using <img> tag, where the src attribute gives the location of the image or gif.


Embedding videos:
You can embed videos in markdown by using the <video> tag, where the src attribute give the name or location of the video. You can also define the dimensions of the video by using the width and height attribute.


Jupyter magic functions:
Magic functions in jupyter are special commands that can help you with running and analyzing data in your notebook. They add a special functionality to jupyter notebook interface.
Magic functions are easy to spot within the code. They either start by % if they are on one line or by %% if they are written on several lines.
Let's have a look at some magic functions used in jupyter and how to call them./p>
html:
The %%html magic function allows you to run html code in jupyter notebook

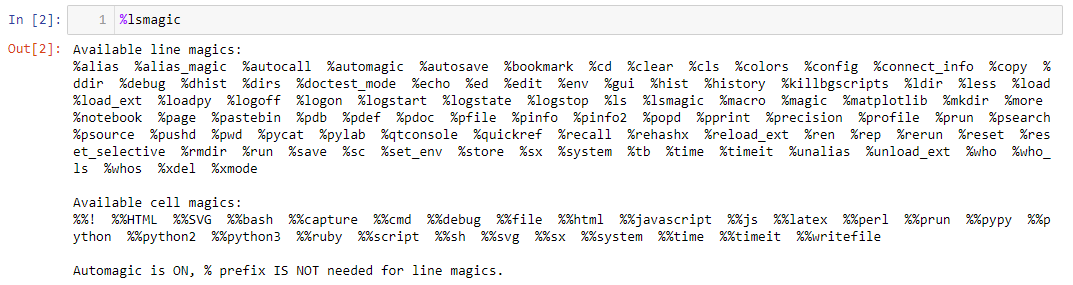
lsmagic:
The %lsmagic magic function gives you a list of al the magic functions available in jupyter notebook
load:
The %load magic function allows you to load the code from any python file saved on the drive


who:
The %who magic function gives a list of all the variables defined in the notebook.
You can pass a data type after command name to list only variables of that particular data type.

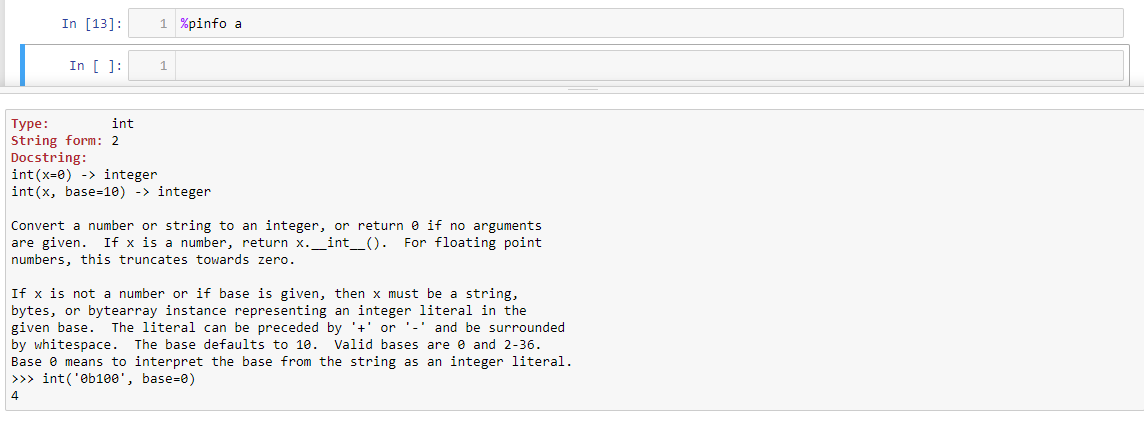
pinfo:
The %pinfo magic function gives details of the objects that are stored in a particular variable.
You can pass a variable name after the command name.
time:
The %%time magic function gives us the time required for execution of a given cell.

run:
The %run magic function runs a file saved on the drive.
You can pass a file name after the command name.

writefile:
The %%writefile magic function writes the code in that particular cell, to another file stored in the drive.
You can pass the file name in which you want to save your code, after the command name.

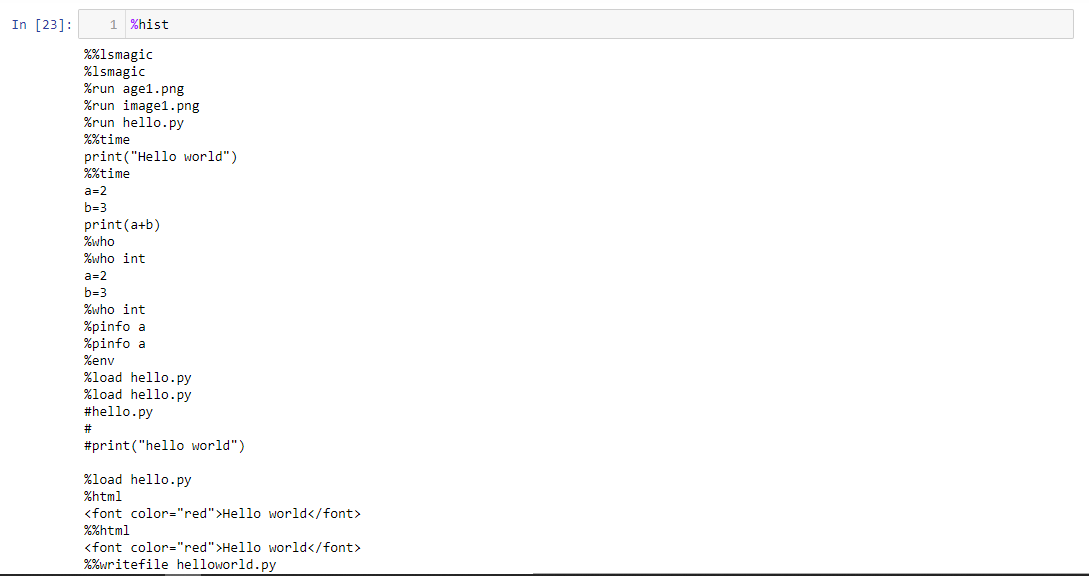
hist:
The %hist magic function gives a list of all the magic functions used in the notebook.
Conclusion
In this article, we looked at the interface of jupyter notebook and understood the different operations that can be performed. We also looked at the different magic functions used in jupyter. We also discussed the different markup tags used in markdown cells for text formatting. We looked at the different type of cells in jupyter and understood the different modes for keyboard inputs. Jupyter notebook is highly configurable and there are a lot of markup tags, magic functions and widgets to explore, we will be discussing most of these as and when required in our code ahead. It is strongly recommended to tinker with different notebook operations on your own.
You can download the jupyter notebook for above post here